Friday, May 31, 2013

Knit-A-Longs and Camp Loopy

I was drawn into doing a Knit-A-Long (KAL) in March for the Eden Prairie Shawl by Nancy Whitman.  I couldn't help it!  It's beautiful!  And for some reason, I'm on a shawl kick right now.  I know, it's spring, and I should be putting my knitting out of the way (yeah right!) and washing my bike and planting my garden.  However, those of us in Colorado just came out of the snow two weeks ago.  My bike is dirty and my garden barely planted.

I fell in love with the Eden Prairie Shawl because I've always been a fan of Frank Lloyd Wright's designs and the Prairie school, the Arts and Crafts movement, and the Mission style.  I love the idea of straight, clean lines, combined with the sweeping movement Nature provides.  I immediately recognized the familiar in the Eden Prairie shawl, and had to create it. 

I chose a picture of a stained glass window as my inspiration, and made my color and fiber choices from there.  Can you see how I'm using the slightly variegated yarn to pull out the colors of the window?  I'm thinking of adding a slight "spot" of red, too, I just need to figure out how to work it in.

 Inspiration window from Stained Glass & More, Inc
I had a great time casting on and following along with the KAL group on Ravelry.  The helpful hints and instructions for making it through the more difficult parts of the pattern came just when I needed them.  I didn't finish with the group at the end of March (actually, I'm still on stripe 6), but I had so much fun I'll definitely do another KAL.  I made a major mistake on where I started stripe 6, instead of picking up from the diamond, I started from the stripe end, so I took it to knit group to solicit suggestions.  I was looking for ways to fix it without having to rip back. While suggestions were provided, the concensus was I wouldn’t be happy (especially with the color changes) if I didn’t rip it out. Since I didn’t have the heart to do it, Linda very kindly frogged it for me, and picked up the live stitches.  MJ bought me a chocolate cookie to ease the pain.  I love my knit group!  I’m almost back to the row I was on before ripping out, only this time with the full stripe length!
Initial start of stripe 6.  Can you see where I made a mistake?

My Current Knitting Status
WIPs (Works In Progress): Eden Prairie Shawl, Montego Shawl (stalled), My First Socks (travelling along with me and slowly being worked, I'm about 2" past the heel of the 2nd sock), and my PrimaDani socks

FOs (Finished Objects): J's Navy Cabled Sweater Wrap and A's Summer Tank (of which I need photos of both from you little sis!), Converse baby booties, and my Ashton Shawlette (see previous posts)

PrimaDani sock in progress!
As if I don't have enough WIPs, I got dragged into joining Camp Loopy!  It's a summer program offered through The Loopy Ewe in Fort Collins, CO.  Project One begins on June 1st, and then a new project begins on July 1st and August 1st, finishing up at the end of August.  There's prizes for everyone who finishes.  Yeah!  My first project is going to be the Skew sock out of Biscotte & Cie Felix in Loopy's Mountain Hike colorway.  It's gorgeous!  I'm swatching now, and will be casting on Saturday!
My Loot!  Yarn, pin, and project bag

Thursday, May 30, 2013

Where's Waldo? Where's Beatrice!

Spring is always so busy!  In the last six weeks I have checked the bees (twice!), co-hosted a Derby Day party, gone to eight various doctor appointments, one vet appointment, cleaned the yard up, and planted my garden.  Whew!

This post will focus on the beekeeping, and I'll get into my garden progress in a later post.  I've discovered a new online tool called HiveTracks that I'm using to record weather conditions during inpections and overall status of the hive.  I really like how it gives range rings showing how far the bees might forage.  You can also see where other hives are at, if users have chosen to share the location.  I'll give it a go this year, and see how well it works out.
Beautiful frame with capped honey
4 April 2013They're alive! Yes!  The girls made it through winter!  There appears to be a fairly decent population, mostly in the top box, covering about six frames.  We can still see honey on the edges, so my fears about starving over the winter appear to be unfounded.  However . . . we couldn't find Queen Beatrice!
Frame inspection:     
  Top box (the previous bottom box which was swapped last fall), using # on frame vs location in box, going left to right
     2: 50% comb drawn on both sides, bees present on right side
    13: from nothing to 90% drawn comb on both sides, heavy with honey, bees present

    14: 95% comb drawn on both, with capped honey and nectar on both sides, bees
     5: 100% comb drawn, really heavy with capped honey, bees     
     6: 80% comb drawn on both sides, some honey, pollen, open brood comb, bees

     7: 90% comb built on both sides, wonky comb, stuck together with frame 11, some bee bread, open brood comb, bees
   11: 95% comb built on both sides, wonky comb, heavy with nectar/honey

   15: 95% comb drawn on both sides, really heavy, ~15 lbs, 75% capped honey on left, 30% capped honey on right, no bees
   12: 50% comb drawn, no bees at all
   19: 95% drawn on left side with 80% capped honey, 10% comb drawn on right 
Bottom box
   16: 100% comb drawn on both sides, with some nectar and honey
     1: 100% comb drawn on both sides, some bee bread, 20% honey on right

     8: 50% comb drawn on either side, some pollen
     
4: 100% comb, some pollen    17: 100% comb drawn, 10% capped honey and lots of pollen
   20: 100% comb drawn, 10% capped honey and some pollen

     9: 30% comb drawn, empty
   18: 100% comb drawn, lots of capped honey, heavy
     3: 100% comb drawn, 40% capped honey
   10: 95% comb drawn on both sides, 50% capped honey on left,

Overall impressions - left plenty of honey to overwinter, they did a great job drawing out comb near the end of the summer, seems like a good population of bees to start spring buildup with, but we didn't find Queen Beatrice.  This is the most worrying.  We didn't see ANY eggs, larvae, or capped brood.  Even though they slow down during the winter, there still should have been something.  Plus, we've always been able to spot QB, even when the hive was full.  Not sure if we should be worrying yet or not.  They were pretty calm if it is a queen-wrong hive.

Added some 1:1 sugar syrup to stimulate brood buildup.  I was hoping to get a split off of this hive this spring, but not so sure that will be happening now.

17 April 2013: Added a pollen patty and checked syrup, they hadn't touched it.  Pulled a few of the center frames and still saw no brood.  DH came with to "ease into it."

16 May 2013The population appears to be dropping, only covering about four frames fully now, although they've spread out a lot as it's warmed up.  DH came out and helped too!  Still didn't find Queen Beatrice.
Frame inspection:     
  Top box (using # on frame vs location in box, going left to right)
     2: 50% comb, some pollen, scattered bees

    13: 90% drawn comb on both sides, some capped honey, nectar, pollen, bees
    14: 95% comb drawn on both, capped honey and nectar, pollen, bees
     5: 100% comb drawn, capped honey, wonky comb cut off, drone cells, bees     
     6: 80% comb drawn on both sides, some honey, pollen, scattered brood with drone cells, empty queen supercedure cell, lots of bees

Possible peanut-shaped queen cell?

     7: 90% comb built on both sides, wonky comb, stuck together with frame 11, bee bread, scattered brood, drone cells, lots of bees
   11: 95% comb built on both sides, wonky comb where stuck to 7, nectar/honey and pollen, scattered brood with drone cells, larvae; might have cells with more than one egg laid in them

But it's empty . . . already hatched or never used?

   15: 95% comb drawn on both sides, really heavy, 75% capped honey on left, 30% on right, 
   12: 50% comb drawn, some bees
   19: 90% comb, about 1.25 frames of capped honey, smattering of bees 

  Bottom box
   16: 100% comb drawn on both sides, with some nectar and honey
     1: 100% comb drawn on both sides, some bee bread, 20% honey on right

     8: 50% comb drawn on either side, some pollen
     
4: 100% comb, some pollen, some scattered larvae   17: 100% comb drawn, 10% capped honey and lots of pollen
   20: 100% comb drawn, 10% capped honey and some pollen

     9: 30% comb drawn, empty
   18: 100% comb drawn, lots of capped honey, heavy
     3: 100% comb drawn, 40% capped honey
   10: 95% comb drawn on both sides, 50% capped honey,

Overall impressions - hive is still pretty calm and quiet if they are without a queen.  Our bees appear to be backwards though, as smoke seems to rile them up and make them louder, vs calmer.  Removed the top feeder for cleaning, but added two entrance feeders with 1:1 syrup.  Put remainder of pollen patty back on top of frames, even though they are bringing in some pollen.  Not sure if we've got a new queen who just wasn't mated well, which could happen due to bad weather and distant location from other hives, or if there's a laying worker.  Guess we'll find out soon enough. 

If there's a laying worker, one of the solutions would be to swap out a frame with one of eggs and capped brood each week until they make a new queen.  Since we don't have a second hive, this isn't possible.  Another solution is to buy a new queen and introduce her to the colony (and hope the laying worker doesn't kill her first), or to buy a new queen and do a shakeout, where you walk your hive boxes at least 100 yards away, shake off each frame, then place the boxes back in the original location, making sure none of the bees were transferred with it.  Then, all the foragers will be able to make their way back to the hive, but the nurse bees (including the laying workers) won't know how to get there.  It's all kind of iffy.  Most places I've looked are sold out of packages and queens for the moment.  It was another rough year for beekeepers.

We also did a sugar roll to test for mites.  Our numbers were really small (hopefully we did it correctly), but we did a powdered sugar treatment anyway, since it doesn't hurt them.  Turn them into candied bees, yes, fatal, no.
Applying the powdered sugar to the top box
I'm trying to work the bees without gloves this year.  While I did put them on for the mite count, I've now managed two hive inspections without them.  I have to remind myself to move slowly without any jerky movements.  Sometimes it's hard when I get tickled by the bees wings!  There was a happy moment when a bee landed on my finger to drink some nectar I'd accidentally got on me when I'd cut off some comb.  The bees tongue is called a probiscus, and it's basically a tube that sucks the nectar up.  It's WAY COOL to watch close up.

Bee drinking nectar off my finger
 2013 Sting count: Me = 0, Sarah = 0, Jason = 1 (or 2? that man's a target)
Reminder that all beekeeping photos taken by Jason R. unless otherwise noted.  Thanks Jason!


Friday, May 17, 2013

Host a Hive Program

Would you like to host a hive?

My husband is afraid of bees.  There, I said it.  He's working really hard at overcoming his dislike for flying, stinging insects, but in the meantime, I can't have a hive in my own yard.  To get around this, our first hive is in an outyard at Dick's place.  But it's a long drive out there, mostly coniferous trees (not ideal forage for bees), and I want some bees closer to me.  So I'm starting a hive hosting program.

Our local beekeeping association, PPBA, has something of an informal program for this (it's how I found Dick's place), but it has no online information, registration, or formal way of matching up beekeepers with locations.  I'm hoping to change this, and have something running for next year.

I'd like to model this hive hosting program on other successful programs, so I scoured the internet.  There were hive hosting programs that charged flat fees, monthly fees, or no fee at all.  Almost all provided honey for the hosting party.  Some programs had specific requirements to be met before hosting a hive.  I narrowed down the options to something I think will work for my area.  So here's my idea/pitch:

Great brood pattern, with pollen around edge and nectar in corners
Wondering what it’s like to keep bees but don’t have the expertise, equipment or time?  Host a honeybee hive for us instead. Hive hosting is easy and FREE!  Hosting means that you will receive all of the benefits of bees without the hassle.  You provide the location and then just let the bees do their magic. You will see increased yield in flower blooms as well as a more productive garden.  We'll set up the hive, install the colony, and drop in periodically to tend the bees.  If the hive produces more honey than the bees require to make it through the winter (normally after the first year), we'll extract the excess honey and you'll receive one free pint of raw, chemical free honey for each hive sited on your property.

Why should I host a hive?

The world needs bees.  Currently there is a huge shortage of bees in the U.S.  Approximately 40% of American hives didn't make it through the winter, due to a variety of problems including pesticides, mono crops, diseases and pests.  Every third bite of food requires pollination, making honeybees a vital part of our food chain.  Local honey has been said to reduce allergies.  What's more local than your own backyard?  Also, bees are endlessly fascinating.  Sit on your porch and watch a fuzzy forager buzzing from flower to flower, filling up her pollen baskets.  Hosting a hive is a great way to help increase the honeybee population in your local area and save the honeybees one colony at a time.  If you want to help pollinate the neighborhood but aren’t sure if beekeeping on your own is right for you, why not participate in the Hive Hosting Program? 

What are we looking for?  The perfect hive location can be complex to describe.  Ideally, the hive should be easily accessible for inspections, and a hand truckable route would be even better (those honey supers can get heavy!).  As far as the bees are concerned, they would prefer a sunny place with a south or east exposure.  All they really need though is a bee safe location, free of pesticides, near a good sources of pollen and nectar.  Community gardens, large yards, mature areas full of flowering trees and native plants are the perfect home for our honeybees.  Giving your neighbor a heads up will help ease any concerns they might have.  If you're not sure that your site is a good location, contact us and let us determine if it will work.  We are in need of locations that are willing to host 1-5 hives.   We’ll provide the bees and everything else they need. 

So, would you like to host a hive?
Contact us for more information, a site visit, and to learn more about helping honeybees.

(Thanks to the Ballard Bee Company 2013 Hive Hosting Program, Nectar, and Beverly Bees, whom I blatantly stole verbiage from.)

What do you think?  Is this a good idea and do you think it will work?

Thursday, May 16, 2013

Catch-Up Continues, August Hive Checks

Please Forgive Me, I'm a Dork.
I wrote this last August, and just realized it had remained in DRAFT format vs being posted.  I think I was waiting to include some photos before posting, but seeing as how it's May 2013, I think I'll just go ahead with this.  Pretend you're in the TARDIS and go back in time about 9 months . . .

Last month we had our niece visit, and this month my parents came out for the weekend.  Of course I had to drag them out with me to see the bees!  I wasn't sure if my dad would be interested in visiting the beeyard, due to an "unfortunate incident" when he was young (shout out to my Uncle Rick here, who had to be rescued from a swarm of bees), but he seemed enthusiastic about the trip and wasn't nervous around the beehive at all. 

Sarah and Jason think the girls were a little more irritated than usual, especially in the bottom box, and I'm not sure if it was that, or if we're just finally getting a larger population of bees.  Plus, ripping through their home doesn't really make them happy. 

At least four full frames were drawn out with fresh comb, nice and even, so it was either the additional wax on the foundation, more consistant feeding, or the population growth, but it was great to see the progress made when the girls work together.

11 Aug 2012sunny and clear; refilled feeders; lots of progress (Yeah! comb building!) and population growth, propolis sticking frames together; many more bees with the yellow markings on them, it's either pollen or they flew through a paint sprayer
Frame inspection:     

  Bottom box, using # on frame vs location in box, going left to right
     2: 40% comb drawn on left side, pollen, 90% drawn on right side, some pollen present; comb is built beautifully even, they've repaired the previous cut out and it looks great
    13: nothing

    14: nothing on left, 95% comb drawn on right, nice and even (!)
     5: 100% on left side, ~5% capped, 100% right side, rebuilding wonky comb     
     6: 80% comb drawn on left side, still wonky comb present, some brood, none capped, 60% comb drawn on right, pollen; some bees with pollen

     7: 40% comb built on left side, 10% comb on right side,
   11: 5% comb built on left, just starting on right side

   12: nothing 
     8: 10% comb built on left, nothing on right
     9: nothing
Top box

   15: 5% comb drawn on left side, right side 20% comb
   16: 5% comb drawn on left side, right side 100% comb (YES!!!) with pollen and nectar
     1: 100% comb drawn on left side, 85% capped brood, 95% drawn on right side, about 5% capped honey, some larvae, some brood

     4: 100% on left, good brood pattern, 100% on right side, with about 50% capped brood, pollen, capped honey in corners;  drone cells
   17: 100% comb drawn on left side, 100% on right side (BAM!), some larvae, some capped honey     
   18: 100% comb drawn on left side, 95% comb drawn on right, lots of honey

     3: 100% comb built on left, Queen Beatrice spotted, 100% comb on right side    10: some wonky comb on left side, 5% comb drawn on right side
   19: nothing 
   20: nothing

My parents, suited up as assistant beekeepers!

Sunday, January 20, 2013

Colors of Dreams

My spinning study group picks a different fiber to focus on each year.  The "Fiber of 2013" is silk.  Silk is everything it sounds like, luxurious, decadent, rich, expensive.  I was a little afraid of spinning silk (who wants to mess up with something so precious?), but that's what the study group is for, providing knowledge and support to try something new.  So I dipped my toes in and bought two silk caps.  Raw silk can be purchased in several preparations; caps, mawatas (a Japanese word that loosely translated means expanded cocoon) or hankies, roving, bricks (kind of like a thick roving folded up), noils, or straight from the cocoons.  I'm going to talk about silk caps here, but will probably mention another preparation later as we are studying it all year.  

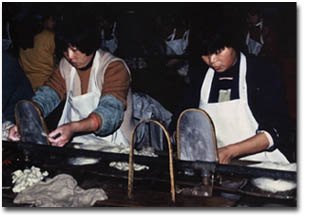
Silk caps are made by boiling the cocoon, killing the silkworm, and degumming the silk.  Then each cocoon is opened and stretched over an arched bamboo strip, as shown below.

Workers stretching silk cocoons over arched bamboo strips to make silk caps.
The final silk cap is sort of a flat bell shape.  I purchased two caps for about $4 each, and each one weighs about 15 grams.  It doesn't sound expensive, but I just paid about $1/gram for undyed, unspun silk.  I decided at this point to just jump in with both feet and dye my silk.  You must understand, I've NEVER dyed anything before, and I decided this on spur of the moment on a Sunday when they needed to be ready to spin on Tuesday.  So I did a you-tube search (what did they do before this?) and found a video of hand-dying silk using food dyes (thank you ChemKnits!)  Who knew that
THIS
+ THIS
=THIS
Dyed silk caps drying on a clean towel
I spent the morning soaking the silk caps in water (enough to cover the fiber), plus about 1/2 cup of white vinegar.  Next time I will definitely soak the silk overnight, as it absorbs liquid slowly and I still had a few undyed spots where my silk wasn't fully saturated.  I set the oven at 175 deg F, and then got out my McCormick food dyes.  That's right, food coloring my friends.  I basically just added drops of colors that I liked, sticking with a blue/green color scheme.  I tried to make each one shade from light to dark, but they blended a bit more than I wanted.  Then I threw them in the oven to bake, he he.

My silk caps dying in the oven.
When all (or almost all) of the dye had been absorbed and the water was practically clear, I removed my fiber from the oven.  This took several hours, because of the low temp.  I heard that if a higher temp is used though, the silk may lose it's luster.  Don't want that to happen!  I removed the fiber from the dye bath and placed it in a strainer in the sink.  Then I ran tepid water over it until the water ran completely clear, and squeezed out as much water as possible with twisting or mauling the fiber.  Silk can take a little rougher handling than wool, but you still need to be careful with it.

At this point almost all of the dye is absorbed out of the water.
Removing the fiber from the dye bath
Rinsing leftover dye out of the fiber


The Final Product
Final Product 2 - Layers separated from each other in preparation for spinning.


Saturday, December 22, 2012

A Trip Through Time

Because I don't have enough hobbies, between spinning, knitting, beekeeping, quilting, gardening and motorcycles, I decided to volunteer my time as a docent at Rock Ledge Ranch.  That's right, volunteer, as in not get paid, donate my free time, work for nothing.

Rock Ledge Ranch is a city park that acts as a living history museum.  I've been out there before during a craft fair but hadn't really thought about it again until some women came to my quilt guild asking for volunteers.  One lady was promoting Quilting Friends of Rock Ledge Ranch, whose main function is to make products that can be sold in the general store either as a fundraiser for Rock Ledge, or under consignment.  This sounded interesting, but they meet during the work week when I have to, well, work.  The second lady was there as a city employee, in charge of the docent staff, trying to drum up volunteers.  I don't know what I drank that night, but somehow my name got written down on some paper and I came home with some informational fliers.  I attended two training sessions, then they let me loose on some real people (they never learn). 

I am a docent for the 1860's Galloway Homestead area.  I wear period appropriate clothing, speak appropriate to the time period (For those of you who know me well, this is incredibly hard.  Apparently only whores and outlaw women swore the way I normally do.  I'm going to ignore what this says about me.), and perform period appropriate tasks.  What does this mean?  Well, I volunteered as a quilter, so my main focus was to sew and quilt something that was popular during the 1860's and 1870's.  I picked out several post Civil War era patterns, chose some beautiful reproduction fabrics, and pre-cut my strips using my rotary cutter (I'm reenacting history, not stupid).  Then I realized that hand sewing a large project could take a long time, especially if I'm only sewing on it during my docent shifts.  It was actually the Junior Docents that gave me a great idea.  To keep the project small and allow others to easily participate, I decided that doll quilts were the way to go.  The strips became squares, easily packed in a sewing basket, along with a pincushion of pre-threaded needles.  I enjoyed sitting outside the homestead cabin, under a tree, sewing my squares together, teaching the junior docents and any visitor who wanted to try. 

My other interests, aka time-consuming hobbies, mesh surprisingly well with the time period also.  I bought some 100% wool yarn and wooden knitting needles and have been knitting a scarf during my docent shifts.  Several children have asked to try, and I've got another pair of needles all set up for them.  I've also brought along some undyed BFL (Blue-face Leicster) wool fiber and a simple wooden spindle and spun some yarn up.  RLR actually has some merino sheep, which they shear in the spring on opening weekend, so it's fun to tie it all together. 

In addition to demonstrating these crafts, we cook (sometimes) over fire, saw logs for firewood, work in the homestead garden, or my favorite, hang out with Patches the Guernsey cow.  I've enjoyed my first season at RLR, and I'm looking forward to next year.
My niece Enya and I outside the Homestead cabin
 

Saturday, September 15, 2012

The Ravellenic Games Torched My Ass

Obviously I didn't finish my Ashton shawlette before the end of the Olympic closing ceremonies, or I would have been bragging it up.  Well, life (meaning family and work) got in the way, and I semi-seriously overestimated my knitting abilities.  No medal for me.  I was able to make continual progress on it though, and I finished it up a few weekends ago.  I had to buy another skein because I ran out of yarn with 7 pattern rows left in chart 4.  I worked on it at Spinners With Altitude knit group (lovin’ these ladies!) and finally finished it up.  I've been waiting to wash and block it until I can borrow some blocking wires (oh, the tools and gadgets used by knitters would boggle your mind), but I'm like a kid at Christmas and just can't wait any longer.  So I soaked it in the sink and used pins and scrap yarn to block it out until it's dry.

soaking in the sink with a little wool wash
my shawl is rolled up inside there somewhere . . . trying to get as much moisture out as I can
The pattern instructions were awesome, and I felt comfortable knitting the entire time.  Maybe lace isn't so intimidating after all!  If I would have had entire days free and hours each evening, I might have been able to finish in time, so I wasn't necessarily completely off in choosing this project for the Ravellenic Games.  It wasn't the difficultly level of the knitting, or beyond my skills, it was just knitting speed and lack of free time.  I should have realized I wouldn't have had that much time, and chosen a smaller project.  Oh well, better luck in 2 years.
Yes, this is a queen size bed my "shawlette" is pinned out on.  And that's a Mass Transit from Bristol Brewing Co. on the bedside.  I needed it after seeing how big this thing turned out.
Blocked it, and discovered my shawlette is definitely a shawl.  No wonder I needed more yarn!  The finished size ended up being 76”x38” vs the 52”x26” called for in pattern.  Oops.  Silly gauge! However, I am loving it.  Could definitely see myself repeating this pattern for a gift also, after making sure I was using correct needle/yarn to get the correct size.  Can't wait for the winter Olympics now!

My beautiful new shawl.