My spinning study group picks a different fiber to focus on each year. The "Fiber of 2013" is silk. Silk is everything it sounds like, luxurious, decadent, rich, expensive. I was a little afraid of spinning silk (who wants to mess up with something so precious?), but that's what the study group is for, providing knowledge and support to try something new. So I dipped my toes in and bought two silk caps. Raw silk can be purchased in several preparations; caps, mawatas (a Japanese word that loosely translated means expanded cocoon) or hankies, roving, bricks (kind of like a thick roving folded up), noils, or straight from the cocoons. I'm going to talk about silk caps here, but will probably mention another preparation later as we are studying it all year.
Silk caps are made by boiling the cocoon, killing the silkworm, and degumming the silk. Then each cocoon is opened and stretched over an arched bamboo strip, as shown below.
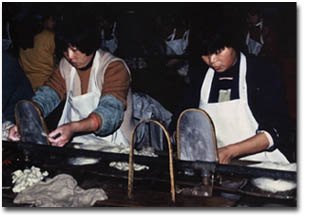 |
| Workers stretching silk cocoons over arched bamboo strips to make silk caps. |
The final silk cap is sort of a flat bell shape. I purchased two caps for about $4 each, and each one weighs about 15 grams. It doesn't sound expensive, but I just paid about $1/gram for undyed, unspun silk. I decided at this point to just jump in with both feet and dye my silk. You must understand, I've NEVER dyed anything before, and I decided this on spur of the moment on a Sunday when they needed to be ready to spin on Tuesday. So I did a you-tube search (what did they do before this?) and found a video of hand-dying silk using food dyes (thank you ChemKnits!) Who knew that
 |
| THIS |
 |
| + THIS |
=THIS
 |
| Dyed silk caps drying on a clean towel |
I spent the morning soaking the silk caps in water (enough to cover the fiber), plus about 1/2 cup of white vinegar. Next time I will definitely soak the silk overnight, as it absorbs liquid slowly and I still had a few undyed spots where my silk wasn't fully saturated. I set the oven at 175 deg F, and then got out my McCormick food dyes. That's right, food coloring my friends. I basically just added drops of colors that I liked, sticking with a blue/green color scheme. I tried to make each one shade from light to dark, but they blended a bit more than I wanted. Then I threw them in the oven to bake, he he.
 |
| My silk caps dying in the oven. |
When all (or almost all) of the dye had been absorbed and the water was practically clear, I removed my fiber from the oven. This took several hours, because of the low temp. I heard that if a higher temp is used though, the silk may lose it's luster. Don't want that to happen! I removed the fiber from the dye bath and placed it in a strainer in the sink. Then I ran tepid water over it until the water ran completely clear, and squeezed out as much water as possible with twisting or mauling the fiber. Silk can take a little rougher handling than wool, but you still need to be careful with it.
 |
| At this point almost all of the dye is absorbed out of the water. |
 |
| Removing the fiber from the dye bath |
 |
| Rinsing leftover dye out of the fiber |
 |
| The Final Product |
 |
| Final Product 2 - Layers separated from each other in preparation for spinning. |


No comments:
Post a Comment